Loading a Model
In SiteVision in the field, you can:
- load a model from Trimble Connect
- use a model that you have already loaded from Trimble Connect that is already on your device
- create a model in the field
- load a model that you have stored on the device
If you have data stored elsewhere that you want to visualize in SiteVision in the field, you must upload it to Trimble Connect:
- Go to connect.trimble.com
- Sign in using your Trimble ID.
- Confirm which server you want to store your data on.
- Create a new project for your Project Site, or select an existing project.
- Create a new folder to store your 2D and 3D models.
- Upload your models to Trimble Connect.
NOTE – You cannot upload folders to Trimble Connect; you will need to create a new folder in Trimble Connect and then upload your data.
To load the data in SiteVision:
- Tap
 /
/  Load Model /
  Connect Cloud and select the required project folder.
 - Find the model you want to visualize, select it and tap
 .
.
TIP – In Trimble Connect, your files can be on different regional servers. The North America server is the default. Tap the menu icon in the top left of the Project Menu window to select a different server.
NOTE – Models in supported file formats are displayed. Any files associated with the selected model file (e.g. JXL, CAL) are not shown in the file listings but will be automatically downloaded as required.
The ![]() text on the display menu indicates that your model has completed assimilation into a Trimble proprietary format, optimized for viewing in SiteVision. If you loaded a file generated directly in the TRB format from an application such as Trimble Novapoint, this does not display.
text on the display menu indicates that your model has completed assimilation into a Trimble proprietary format, optimized for viewing in SiteVision. If you loaded a file generated directly in the TRB format from an application such as Trimble Novapoint, this does not display.
TIP – This option is useful if you do not have data connectivity out in the field, or if you want to save on cellular data usage. You can download the data in the office, and use this option once in the field.
NOTE – When using the Connect Local option, you may not be loading the latest model if the data has been updated on Trimble Connect since you loaded it from Trimble Connect.
- Tap
 /
/  Load Model /
  Connect Local. You can see only models that you have previously loaded, and not models loaded by a different user.
 -
Find the model you want to visualize, select it and tap
 .
.
This option may be useful for visualization or simple data collection.
NOTE – You must have an Internet connection to create a new model in the field.
- Tap
 /
/  Load Model /
  New Model.
 - Enter a name for the model and tap OK.
Models that you create in the field are automatically saved to Trimble Connect under a new project, named SiteVision Data. The project is saved to the server that you used most recently.
SiteVision creates a localized Transverse Mercator projection around you, with coordinates of 0,0,0.
You can sync data and measurements that you collect in the model to the project in Trimble Connect.
You can load a model that is stored on your device. This option requires the model to be stored in TrimBIM (.trb) format.
TrimBIM (.trb) is a file format for efficiently storing 3D BIM/Civil geometry and attributes with in-memory fast random access. It is not a replacement for IFC or any other formats, but a more intelligent way to access model data. TrimBIM speeds up BIM processes significantly.
There are several ways to convert your model to .trb format:
- From Trimble Business Center using the SiteVision AR Exporter
- From Trimble Connect Desktop
- From Trimble Quadri
See below for details on each of these options.
NOTE – If you are using Automatic Placement, remember to also copy the appropriate Trimble Calibration File (JXL, CAL, DC) to your device along with the .trb model.
- Tap
 /
/  Load Model /
  My Data.
 - Navigate to where the model is stored on your device.
- Tap to select the model that you want to load, and tap Open.
NOTE – By default, SiteVision searches the This PC > Documents location for TRB files to open.
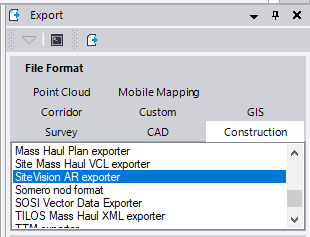
For data in Trimble Business Center a .trb can be quickly generated by using the SiteVision AR Exporter.
- From the Export window in Trimble Business Center, use the SiteVision AR exporter to export your model data.

This will export three files, including a .trb.
- Copy the .trb file to your device. You can then load it with the My Data workflow.
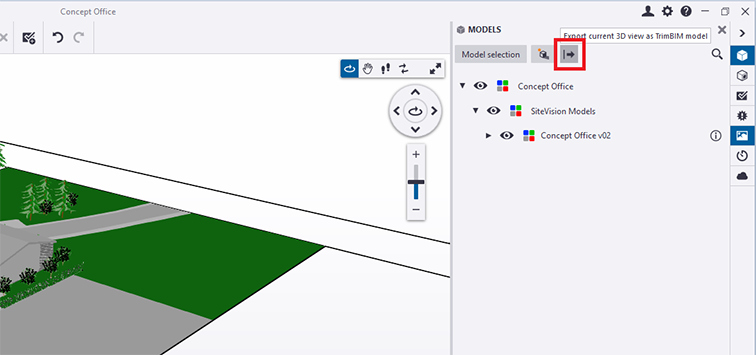
For data on Trimble Connect, the Trimble Connect Desktop application can be used to generate a .trb file.
- Load your model in Trimble Connect Desktop.
- In the right hand MODELS pane, click the Export current 3D view as TrimBIM model button (highlighted below).

- Copy the .trb file to your device. You can then load it with the My Data workflow.
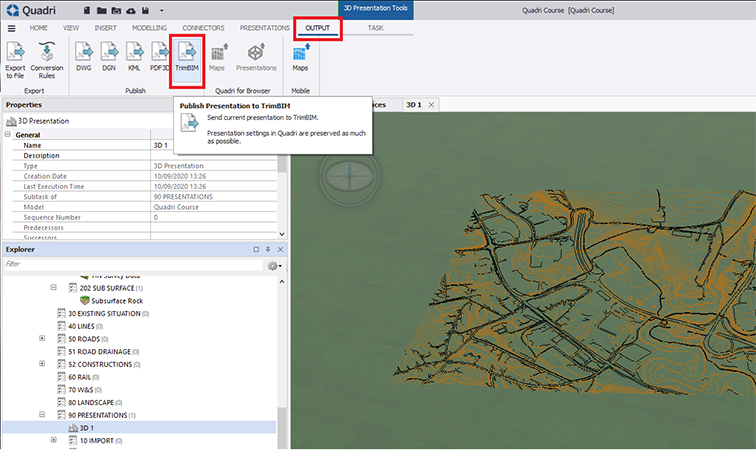
For data on Quadri, a .trb can be generated as an output from any 3D Presentation Task.
- Create a 3D Presentation Task containing the model data you require.
- Select the Output tab of the 3D Presentation task, then from the Publish ribbon select the TrimBIM option.

- Confirm the settings, select your preferred output location from the list of Connections in the External Delivery ribbon, then click Finish.

- Copy the .trb file to your device. You can then load it with the My Data workflow.
When you have loaded a model, you must connect to and configure the GNSS receiver.