Creating a Trimble Site Calibration file
The following section describes how to create a Trimble Site Calibration file for automatic placement of models.
NOTE – you can skip this section if you intend to use the Measured Placement function to place your models in the field.
Many third party model formats and some Trimble formats either do not have the necessary georeferencing information stored in the formats, or the georeferencing information is not currently supported. In this case a Trimble Site Calibration file (DC, JXL, CAL) can be used to provide this georeferencing information. If you do not have a Trimble Site Calibration file, use Trimble Business Center to create one:
- Start a new project in Trimble Business Center.
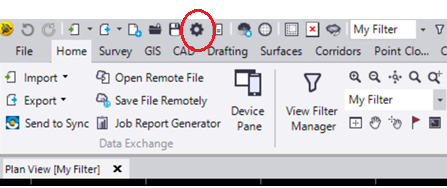
- From the top toolbar, select Project Settings.
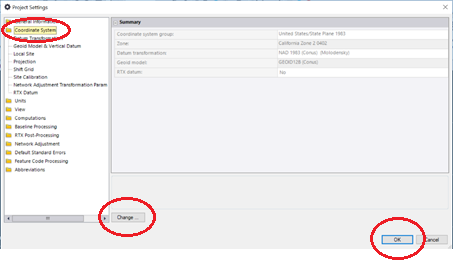
- In the Project Settings window, select Coordinate System then tap Change to select your required coordinate system. Tap OK.
- On the Home tab, tap Export and then select the Survey tab.
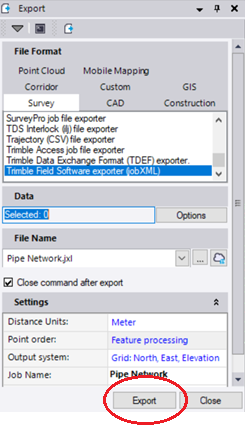
- Select the Trimble Field Software exporter (jobXML).
- Enter a file name and tap Export.
NOTE – You do not have to have any points in the model. If there are control points in the model, they do not need to be selected for inclusion in the jobXML (JXL) file.
NOTE – For georeferencing models that do not have a supported co-ordinate system, a JXL file with the Selected:0 data will create a Georeferenced file with just the necessary projection and geoid model information. This file must be renamed to match your model name and stored in the Trimble Connect folder with your model.
Setting a default Site Calibration file
Prior to SiteVision version 2.00, to associate a calibration file with a model file the file names of the model and the calibration file had to be the same; this meant that a calibration file needed to be created for each model file.
In SiteVision v 2.00, you can place a "default" calibration file in a folder on Connect, and that calibration file will be applied to all model data in that folder. This means you do not have to create a new calibration file for each model, and you can instead set up a calibration for a folder / site.
To set a default calibration file:
- Name the default calibration file the same as the Connect Project.
- Place a copy of the default calibration file within each folder of your project that you want it to be applied to.
NOTE – If another calibration file is associated with a model (i.e. there is a calibration file in the same folder as the model, and with the same name as the model) then that takes priority over the default calibration file.
The following example illustrates this:
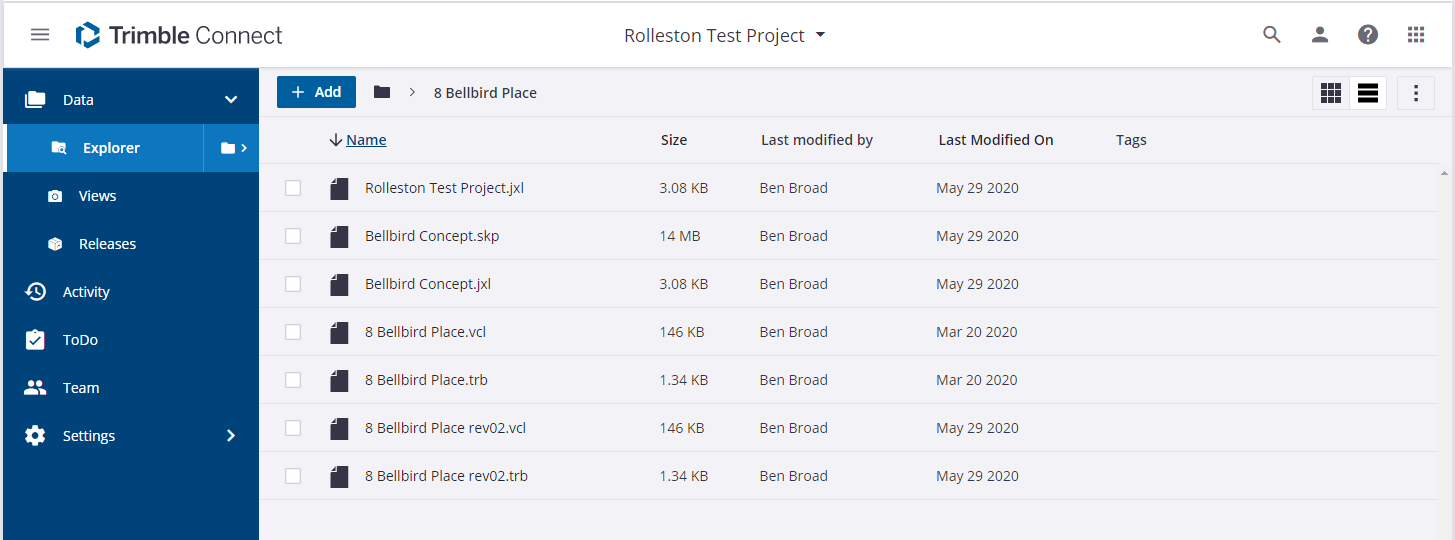
- For the project Rolleston Test Project, a default calibration file has been created named Rolleston Test Project.jxl.
- When loading the models 8 Bellbird Place.trb, and 8 Bellbird Place rev02.trb, the default calibration file Rolleston Test Project.jxl is applied.
- When loading the model Bellbird Concept.skp, which has an existing matching calibration file Bellbird Concept.jxl, this matching calibration file takes precedence over the default calibration file.