Using the PDF app 
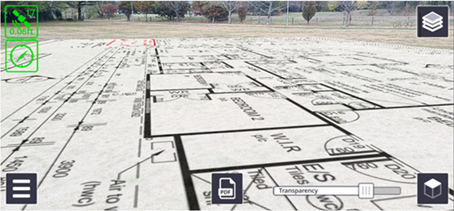
The PDF tool allows you to visualize a PDF plan or JPG, TIF, PNG, or HEIC image alongside an existing 3D model or the real world. The workflow for PDFs and images is the same. The JPG, TIF, PNG, and HEIC image formats can be imported, scaled, and viewed in SiteVision in exactly the same way as PDF plans.
To position and correctly scale a PDF plan or image file you will need to identify two known points in the real world that correspond to the PDF plan / image.
TIP – By tapping on a PDF or image file either on your device or as an email attachment, you will have the option to Open with Trimble SiteVision; this automatically imports the file into the app, and adds it to the Document Library, ready to visualize.
-
Tap the
app icon. -
If the file you want is not already loaded into the SiteVision app, you will need to import it. You can select a file to import from Trimble Connect, your device, or some other file storage location such as iCloud Drive, Google Drive, DropBox, OneDrive etc. Tap Trimble Connect or
 My Files from the side panel to navigate to the file you want to import.
NOTE – To select a file from a file storage location, you must have added the required file storage source(s) to your device's File Management app so that SiteVision can access the storage source(s).
-
If you have imported PDF or image files into SiteVision already, you can select them from the Document Library.
While you are online, to ensure all data is up to date, tap
 in the top right of the screen to sync all files from this Document Library with Trimble Connect. Alternatively, tap-hold a file to select it, then tap other files to select them, then tap to sync just the selected files.
NOTE – The Document Library shows all the files imported to the device, including from previous sessions.
NOTE – When syncing files, any files already placed within models will be automatically updated.
-
-
Tap
 to continue.
NOTE – When you select a file to place, and that file is from Trimble Connect, if you are online the file is synced automatically with the latest on Trimble Connect.
-
Scroll through the page preview and tap to select the specific page you want to visualize.
-
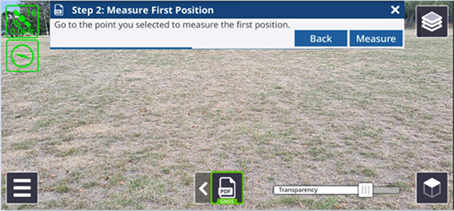
Select the first known point on your plan by zooming and panning to position the crosshairs at the correct location. Tap Select to confirm the point selection.

TIP – The
 button in the lower right corner will rotate the file if it has not been loaded with the correct orientation.
 -
Navigate to the first known point.
-
Repeat the previous two steps to select and measure a second known point. After measuring the second point the file will be placed in the 3D view at the correct scale and location.
TIP – When selecting two points to use to position the file, Trimble recommends that you select points that are far away from each other to provide a good baseline and ensure accurate positioning and scaling.
Multiple pages from the file can be loaded and displayed in this way. Each page will be displayed within the SiteVision layer manager, and visibility can be toggled like any other layer. Each page is stored as a separate layer—e.g. if you place 3 pages from a single file, 3 separate layers are created, indicated by <PDFname> + (<page number>).
Any placed files from previous sessions of SiteVision are stored under a Prior User Measurements layer.
You can delete files from the Document Library if required.
-
To delete a single file, tap to select it then tap
 .
. -
To delete a number of files, tap-hold a file to select it, then tap other files to select them, then tap
.