Preparing Esri File Data
Esri format Shapefile and File Geodatabase data must be uploaded to a Trimble Connect Maps workspace. See Getting Started with GIS Data for instructions on how to upload this data to a Trimble Connect Maps workspace ready to view in SiteVision.
SiteVision supports the following Esri Feature Class types:
-
Line
-
Point
-
Polygon
-
Multipoint
NOTE – SiteVision does not support Multipatch Feature Class types. However you can use the Export to CAD command within ArcGIS to save these as a DWG which is supported by SiteVision.
SiteVision supports 2D Esri data. When 2D data is detected, SiteVision by default displays the data on a horizontal plane located 1.5 m below the APC of the SiteVision unit. For typical handheld use in flat areas this places the data close to the ground surface.
For more accurate visualization of 2D Esri data, you can also drape the data by combining it with a Trimble Terrain Model (TTM) file (see Draping 2D Esri Data for more information) or applying attribute based elevations with the SiteVision Manager.
SiteVision also supports 3D Esri data. When 3D data is detected, SiteVision by default treats the Z values as absolute elevations and displays the features at the appropriate elevation.
You can alter this behavior by defining rules using the SiteVision Manager, so it is possible to differentiate between e.g. ground surface, pipe invert, or depth below ground.
SiteVision supports Esri data in most common published coordinate systems, including both Geographic and Projected coordinate systems. When you create a Trimble Maps workspace you will be prompted to set the Map workspace coordinate system.

NOTE – If the coordinate system of your data does not match the coordinate system of your Trimble Maps workspace, then Trimble Maps will attempt to convert your data when you upload it.
Height Above Mean Sea Level
Select this option if your data has been captured in terms of a Geoid model. If this setting does not match, your data may display at the incorrect height. Note that this setting will only apply if your Esri data is 3D.
Unsupported Coordinate Systems
Trimble Maps contains an extensive database of published coordinate systems. If however your data is in an unsupported coordinate system, a message will display indicating this.
NOTE – Given the variability in how GIS users configure their data, if you experience difficulty with getting your data to visualize correctly, Trimble recommends that you engage the services of a suitably qualified consultant such as a Trimble distribution partner’s GIS consulting services team to assist in the configuration of your workflow.
To enhance the visualization of 2D Esri data, you can drape the data on a 3D surface. This is particularly helpful in areas where the terrain is sloping or undulating—points and lines will follow the natural shape of the land rather than resting on a horizontal plane.
Currently SiteVision only supports surface draping with a Trimble Terrain Model (TTM), which is a vector based TIN surface. Only 2D Esri data can be draped. 3D Esri data (or 2D data that has had 3D elevations assigned by the SiteVision Manager) will not drape, and is always displayed based on the elevation contained within the data.
NOTE – If you experience unexpected behavior with data draping, check your data is in fact 2D. 3D data with ‘0’ value elevations can easily be mistaken for 2D data.
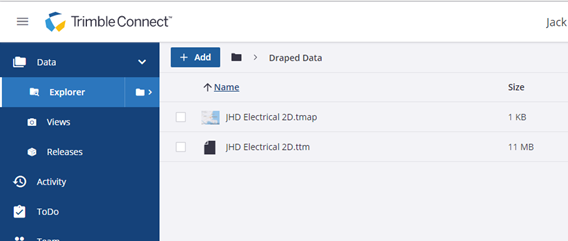
To enable draping the TTM file must be placed into the same folder on Trimble Connect as the Tmap containing your Esri data, with the matching file name. The TTM data must be in the same coordinate system as the Esri data.

When you view the draped model in SiteVision, the Esri data displays draped in 3D, while the TTM surface is invisible so will not be displayed.
-
Open Sitevision.
-
Select Load Model.
-
Navigate to the location of your Esri data.
-
Select the Esri data and tap
 .
.