Setting up the SiteVision Hardware
SiteVision supports two different hardware configurations:
|
|
mounted on a survey pole or extension rod with a standalone Trimble DA2 GNSS receiver This is supported on Android and iOS devices. |
|
|
the SiteVision Integrated Positioning System This is supported on Android devices only. |
When you purchase SiteVision you will need:
-
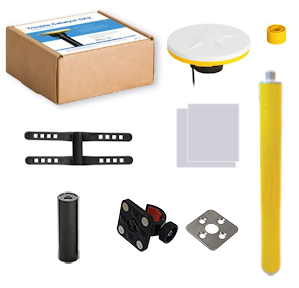
1x Pole
-
1x Device Clamp
-
Trimble Catalyst DA2 GNSS receiver kit that includes:
-
1x Catalyst DA2 receiver
-
1x 5/8x11 pole cap
-
1x Battery pack mount strap
-
-
1x ANKER PowerCore 5000 Power Bank (5000mAH)
-
1x Sunshade attachment (optional)
NOTE – This is the Trimble recommended hardware configuration for using SiteVision with the Trimble Catalyst DA2 GNSS receiver. Depending on the use case, it may be preferable to use alternative clamps or poles. As long as this alternative mounting system complies with the geometric requirements outlined in Step 2: Attach your device and the Catalyst DA2 receiver to the pole, and Step 3: Attach your device to the pole with your device clamp, this is acceptable.
NOTE – A mobile phone / tablet is not provided. Refer to SiteVision System Requirements.
The Catalyst DA2 receiver has a convenient push-fit mount for simple attachment to any 1 ¼” diameter pole. A 5/8” x 11 thread adaptor for convenient installation/removal on standard mapping and surveying accessories is also included in the box.
For consistent and accurate results:
-
When mounting the receiver on the pole, ensure that it is flat and secure on the pole.
-
If using the push-fit 5/8” x 11 thread adapter, ensure that the yellow plastic of the thread adapter is completely concealed in the push-fit mount.

To assemble the battery mount
When using SiteVision with the Catalyst DA2 it is required to use an external USB power pack. You can attach a standard off-the-shelf single-cell USB power pack to the survey pole using the supplied battery mounting bracket and rubber straps. The supplied battery mount is designed to fit a variety of range pole and USB battery pack sizes.
For maximum rain-resistance, mount the battery with the USB socket facing towards the ground.
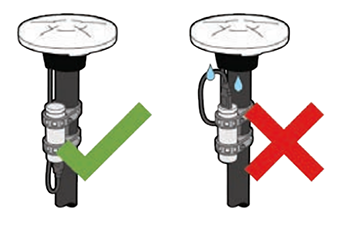
IMPORTANT - Do not plug the Catalyst DA2 receiver directly into your device to deliver power. When using SiteVision you must use an external USB power pack.
When attaching your device to the pole, Trimble recommends the SECO magnetic device clamp. Depending on the specific use case requirements and device size, alternative mounting methods are acceptable. The key requirement when mounting the device to the pole is that it is attached parallel to the pole, so that the camera is pointing horizontally with respect to the Catalyst DA2 receiver.
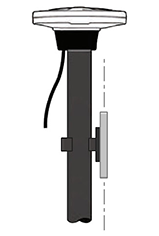
IMPORTANT: Your device must be attached parallel to the pole, so that the camera is pointing horizontally with respect to the Catalyst DA2 receiver.
Activate the USB battery pack and press the button on the bottom of the DA2 receiver to turn it on.
The LED status is as follows:
-
Flashing blue = receiver is discoverable and ready to pair/connect.
-
Solid blue = receiver is connected to SiteVision
-
Red = Fault. Turn off the receiver, then turn it on again. If the fault indicator persists, contact your Trimble distributor.
-
Yellow = receiver software update is in progress
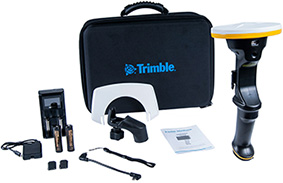
When you purchase the SiteVision Integrated Positioning System you should find the following items in the case:
-
1 x Trimble SiteVision Integrated Positioning System
-
1 x USB C to USB C Cable
-
1 x Pole Mounting Bracket
-
1 x Sunshade Attachment
-
2 x Batteries
-
1 x Dual Battery Charger
-
1 x Charging Cable
-
1 x International Adaptor Kit
-
2 x Adhesive Phone Mounts
-
1 x Wrist strap
-
1 x Quick Start Guide
-
1 x Shoulder Strap for the Case
NOTE – A mobile phone / tablet is not provided. Refer to SiteVision System Requirements.
Before turning on and using SiteVision charge the batteries fully with the provided charger. Plug the charger into your PC or an existing USB wall adaptor.
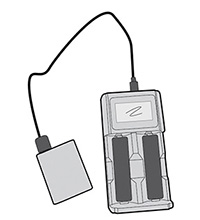
The battery charger will charge two batteries simultaneously and provides information on the level of charge.
Depending on the level of battery charge, charging the batteries fully may take over 6 hours.
CAUTION – Do not charge the battery in temperatures below 0 °C (32 °F) or above 40 °C (104 °F).
-
Twist open the bottom of the SiteVision system.
-
Insert a fully charged battery, positive down as shown.
-
Push and twist the bottom cap of the SiteVision system to close it and secure the battery. Note that the cap must be fully closed to ensure a good seal.
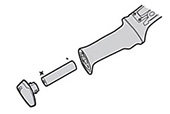
CAUTION – Use only the supplied battery.
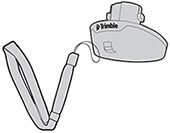
Attach the wrist strap to the base of the system as shown.
-
Thread the fine chord loop through the attachment guide.
-
Feed the main wrist strap through the fine chord loop.
-
Pull on the wrist strap to tighten and ensure that it is secure.
Trimble recommends using a rugged hard plastic case with your mobile device, for example an OtterBox® Symmetry Series®.
CAUTION – DO NOT use a soft plastic or rubberized case.
-
The adhesive on the mount used to attach the device to the SiteVision system may not bond securely to the case material.
-
Some movement will occur between the case and the SiteVision positioning system, reducing the accuracy of the system.
Trimble recommends that you attach the adhesive mount to the rugged case. This allows you to use the device independently of the adhesive mount if required.
CAUTION – The mount's adhesive is very strong, so in the event that you have attached it directly to your device, you must exercise extreme caution if you try to remove the mount.
If available, use isopropyl alcohol to clean the back of the device or device case where the adhesive mount will be attached.
-
Place your device on a flat surface.
-
Remove the protective film from the adhesive phone mount.
-
Align the phone mount with the center of the device, then press down firmly to fix the adhesive.
IMPORTANT: Allow a minimum of one hour to ensure proper adhesion.
-
Hold the SiteVision positioning system in one hand, and rotate the latch on the right side up (anticlockwise), to open the locking mechanism.
-
Hold your device securely with the camera on the right side of the SiteVision positioning system, and slide the mount plate on the back of your device into the mount slot on the SiteVision positioning system.
-
Hold your device firmly with one hand and rotate the latch down to secure the device in place. Check that the latch is fully down to the locked position.
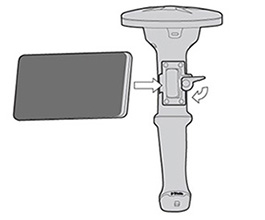
Make sure your device's USB C socket is on your left when the device is mounted on the SiteVision system.
The end of the USB cable with the double plastic rim / ![]() icon must be connected to the SiteVision system to ensure it is weatherproof.
icon must be connected to the SiteVision system to ensure it is weatherproof.
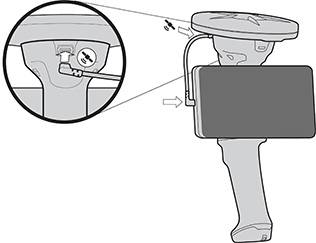
Push the power button on the SiteVision positioning system (under the antenna) to turn on the SiteVision system. The power button lights up when the system is switched on.
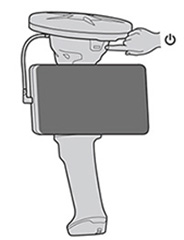
The illuminated button color indicates the charge level of the battery as follows:
-
No light = off
-
Green = Good battery charge
-
Blue - Electronic Distance Measure (EDM) connected
-
Flashing red = Low battery charge
-
Solid red = Battery flat, system powered by mobile device, EDM disconnected
The SiteVision system's battery provides power to the GNSS and the EDM unit, and also provides a slow charge to your device to increase its operating time.
When the internal battery is flat, indicated by a solid red light, the system automatically switches to providing power to the GNSS system from the mobile device's battery instead. When this switching occurs you will see the GNSS system drop all satellite tracking and restart.
While operating in this mode:
-
you can continue to visualize models and make GNSS measurements, but you cannot use the EDM to take measurements.
-
your device's battery charge will deplete faster.
Trimble recommends that you replace the battery in the SiteVision integrated positioning system with a fully charged battery as soon as possible.

