Using the 3D Scan app 
The 3D Scan app is used to capture a high quality georeferenced point cloud. This point cloud is saved in LAZ format, and includes coordinates, color, and classification.
Important: The 3D Scan app is only available on LiDAR-equipped iPhone Pro and iPad Pro devices. The Scan app is not available on iOS devices without a LiDAR sensor, or Android devices.
Prior to scanning you will need to load a model. Scans will be captured in the same coordinate system as the model you have loaded.
To begin scanning:
-
Open the 3D Scan app from the apps carousel.
-
Tap
 ; the app begins capturing points. The range of point capture varies based on the material and lighting conditions, but will be up to a maximum of 5 meters (5 yards).
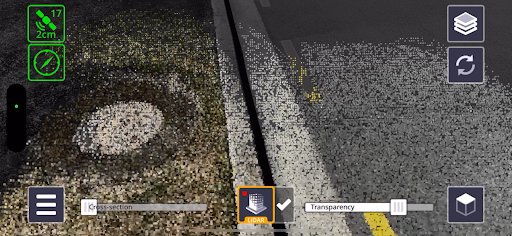
-
Continue capturing points until you have completed your scan. You can pause (and resume) point capture at any time by tapping
 .
.TIP – If you want to cancel your scan, double-tap
. -
Once you have completed scanning, tap
 on the right side of the Scan icon; you are prompted to enter a name for the scan.
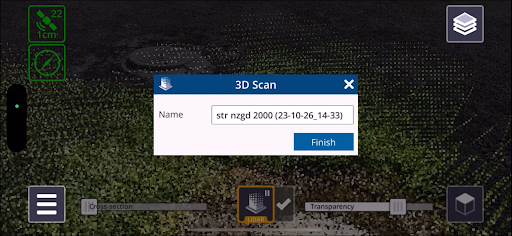
-
Tap Finish to save the scan.
Once you have captured a scan the Sync icon ![]() appears in the top right of the screen. When you are ready to begin the sync process, tap
appears in the top right of the screen. When you are ready to begin the sync process, tap ![]() .
.
TIP – Due to the size of scan data it may be preferable to use a Wi-Fi data connection (rather than cellular) to sync the data.
The scan data will be uploaded to Trimble Connect and placed in a new folder called SiteVision Scans. This folder will be created in the same location as your loaded model.
NOTE – You can also capture a 3D scan with a model loaded from your local device. In this case, when you tap ![]() , you are prompted to save the LAZ file via the iOS share dialog. This allows you to save the file locally to your device, or send it to other file sharing apps such as Google Drive.
, you are prompted to save the LAZ file via the iOS share dialog. This allows you to save the file locally to your device, or send it to other file sharing apps such as Google Drive.
Georeferencing your 3D scans
To ensure accurate scan results that are georeferenced correctly to your model, it is important to ensure your model is placed correctly prior to starting your scans.
GNSS placement
When scanning with models using GNSS placement, placed automatically or with a Measured Placement with an active GNSS connection, you must obtain both a green position and orientation before you are able to initialize the 3D scan.
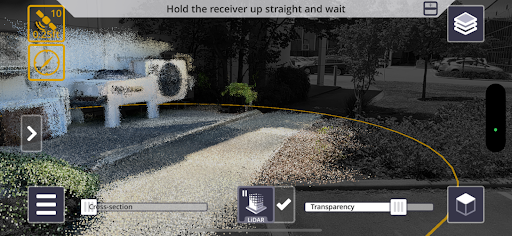
While scanning, if your GNSS accuracy subsequently degrades (due to entering a GNSS denied area), you can continue scanning but you will be restricted to an area within 5 meters (5 yards) of your last green GNSS position. This area is displayed as a yellow circle (as shown in the image below), and it is not possible to capture data outside the limits of the circle.
Returning to a green GNSS position will allow you to resume scanning as normal.
Non GNSS placement
It is still possible to create georeferenced scans when working with a Manual placement or Marker placement. This allows for scanning in GNSS denied areas such as indoors or even underground. With a Manual placement, the 3D Scan region will be limited to within 5 meters (5 yards) of where the scan was initialized; with a Marker placement, the 3D Scan region will be limited to within 5 meters (5 yards) of any scanned Marker.
Size of scans
The exact area and size of scan that can be captured varies based on the device, and also the complexity of the loaded model. SiteVision will calculate the maximum size of allowable scan. Once 65% of the scan size is reached, a green progress bar appears on the screen above the icon. When the maximum scan size is between 80% and 90%, the progress bar changes to orange; between 90% and 100%, it changes to red). Scanning can continue, but will be halted once the bar completely fills up.
Scanning best practices
Following are some tips and tricks for getting the best results using the 3D Scan app:
-
For best quality results, use slow and steady movements when scanning. Fast movements and swings can reduce the quality of the data. Horizontal sweeping (a natural tendency) is not recommended, and vertical sweeping (unless gently) gives the worst results. An exception is that a gentle vertical single pan is the best way to capture features such as poles.
-
Reducing the speed and the frequency of turns will help keep AR drift to a minimum.
-
For edges, such as those of concrete slabs, it is recommended to walk in the same direction as the edge, to get the best definition.
-
It can be difficult to capture shiny or reflective surfaces such as bare metal or road signs, and transparent materials such as glass or water will not be captured. It is also difficult to capture black surfaces and certain vegetation.
TIP – For optimal performance keep your LiDAR sensor clean by following the manufacturer instructions. Buildup of dust/grease can impair the performance of the sensor.